Troubleshooting Manual
Snow blowers are subjected to harsh outdoor conditions on a frequent, almost daily basis during the winter season – often the snow is riddled with foreign objects ranging from pebbles to small rocks. These constant interactions with your blower’s augers can eventually lead to small issues from time to time. However, unless there’s a serious problem you should be able to resolve most minor issues without having to take the machine to a service center. Do bear in mind however that if you’re not comfortable operating power tools or have no prior experience repairing outdoor equipment, proceed to visit a service center.
Always prioritize the safety of yourself and those around you
Never attempt to operate the snow blower or any other outdoor equipment without first going through the included instruction manual and familiarizing yourself with all the machine’s controls and operations. Failure to heed to these instructions could result in misuse that causes significant damage to the mower which will not be covered under the warranty.
- Never allow young children to operate the snow blower – do not allow adults to operate the blower without adequate instructions.
- Before operating the machine, ensure that the area to be traversed is free of people, pets and other obstacles.
- Exercise extra caution when operating the snow blower on sloping surfaces and when moving in the reverse direction.
- Objects such as boards, doormats, wires and any other objects should be removed before operating the blower.
- Ensure that all clutches have been disengaged and that the shifter is in neutral when starting the blower.
- Ensure that you’re wearing appropriate winter clothing before operating the blower – however, avoid wearing long loose clothing that could get in the way. Ensure that the footwear you choose has adequate grip for slippery surfaces.
- Remember to only use a suitable fuel container when refilling the machine’s fuel chamber
- Fill the tank outdoors as far as possible. If you must fill indoors, ensure that the area is well ventilated and the space is large enough to prevent fumes from building.
- Snow blowers have rotating sharp parts that can cause severe injury – ensure that you stay well clear of the front end of the snow blower during operation.
- Certain engine parts can get quite hot when operating, especially for long durations. Exercise caution when handling the blower to ensure that you do not touch these parts of the blower.
- Never operate the blower in a closed setting as the combustion fumes can be toxic.
- When refueling, ensure that the nozzle is always in contact with the head of the fuel chamber to prevent spillage. Refrain from using devices that lock-open the nozzle.
- Wipe clean any spilled fuel before replacing the fuel cap – spilled fuel can ignite if the surface temperatures become high enough, causing serious potential for harm.
- Take care to adjust the height of the skid plates before operation to clear the ground of rocks and other objects on the ground that you may not be able to see.
- Do not try to adjust any of the blower’s components when the engine is running.
- It is highly recommended that you wear safety equipment such as eye shields when operating the blower.
- If you strike a foreign object, stop the blower immediately and assess any possible damage that may have occurred. If severe, do not proceed with operation until the damaged component has been replaced.
- Excessive vibration is a bad sign and if noticed, stop the engine and inspect the components thoroughly before proceeding. If you’re unable to determine the cause of the vibration, take the unit to a service center to have it analyzed by an authorized technician.
- Ensure that the discharge tube is always directed away from places that could be susceptible to damage, such as window panes.
- Refrain from operating at higher ground speeds when blowing on inclined surfaces.
- Disengage the power cords when the unit is being transported or stored at the end of the season.
- Never store the machine next to flammable materials at the end of the mowing season.
- Ensure that you maintain all components and service the unit regularly as directed in the included engine manual.
Learn the important controls and switches
Ensure that you are thoroughly familiar with all your blower’s main controls before you attempt to operate the unit.
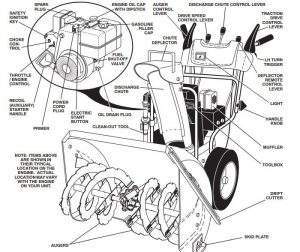
- Safety ignition key:
The engine will not start until the ignition key has been inserted - Electric starting button:
Push the electric start button to crank the engine to a start - Recoil start handle:
This is also used to bring the engine to start - Choke control:
This is used to start the engine under colder than usual conditions - Throttle control:
This is used to increase or decrease the engine speed or rotations per minute - LH and RH triggers:
These levers are used to steer the blower - Drive speed control lever:
This lever enables the driver to select the front or back direction of motion as well as adjust the snow blower’s ground speed - Traction control lever:
This is used to increase power propulsion in the forward or reverse direction - Auger control lever:
This is used to activate the motion of the blower’s augers - Discharge chute control lever:
This is used the adjust the direction that the blower throws the snow in. - Deflector remote control lever:
This is used to adjust the throwing distance of the snow emitted by the unit - Skid plate:
This is used to adjust the ground clearance of the snow blower and raise or lower the scraper bar from the blowing surface - Drift cutter:
This is used to enhance throwing when ploughing through deeper snow
Troubleshooting
Husqvarna blowers as any other brand models may experience some troubles from time to time. We have created most common problems troubleshooting table and you should feel free to use it anytime. Remember not to troubleshoot the machine yourself when you suspect you don’t have enough knowledge or/and skills
Table 1. Husqvarna snow blowers- most common problems troubleshooting
| Problem | Possible Cause | Solution |
|
Engine does not start
|
Fuel shut off valve has been left in the OFF position | Turn the fuel shut off valve so it lies in the ON position |
| The safety ignition key needs to be inserted | Insert the safety ignition key into the corresponding slot | |
| The fuel tank is empty | Fill fresh gas in the fuel tank | |
| Throttle has been left in the STOP position | Shift the throttle lever to the FAST setting | |
| The choke lever has been left in the OFF position | Activate the choke by shifting the lever to the FULL position | |
| The primer has not been depressed | Refer to the operational manual to determine the right manner to prime the engine | |
| The engine may have flooded | Wait for a few minutes for the engine to clear out before attempting to start the engine again. Ensure that you do not prime the engine this time. | |
| The spark plug circuitry may have been disconnected | Inspect the spark plug circuitry and reconnect the appropriate wires if necessary | |
| The spark plug might be faulty | Inspect the spark plug and replace if necessary | |
| The fuel in the tank may have grown stale | Clear out the fuel and refill the tank with fresh gasoline | |
| Water may be mixed in the fuel | Drain both the fuel tank as well as the machine’s carburetor and refill with fresh gasoline. | |
| The fuel cap vent might be clogged | Inspect the fuel cap and replace with a new cap if required | |
|
Engine loses power when blowing snow
|
Spark plug assembly may have become loose | Inspect the spark plug circuitry and reconnect the appropriate wires if necessary |
| Too much snow might be being thrown by the blower | Reduce the speed of the blower and decrease the swath width | |
| Fuel cap vent may have become clogged with ice or snow | Inspect the fuel cap and replace with a new cap if required | |
| The muffler may have become dirty or gotten clogged | Clean out the muffler and repace if required | |
|
Engine idles in a rough manner
|
Choke might be left in the FULL position | Shift down the choke lever to the OFF position |
| There could be a block in the fuel line | Clean out the fuel line | |
| The fuel might have grown stale | Refill the fuel tank with fresh fuel | |
| Water may be mixed in the fuel | Drain both the fuel tank as well as the machine’s carburetor and refill with fresh gasoline. | |
| Carburetor may have become out of tune | Adjust the carburetor as required | |
|
Excess vibration coming from the unit
|
Parts may have become loose | Inspect all the blower’s various components for damage |
| Auger might be wearing out | Check the auger blades and replace them if necessary | |
| Recoil start has become difficult to pull | Starter cabling might have frozen over | Refer to the operational manual to determine the right manner to thaw the cabling |
|
Loss of traction while driving
|
Drive belt may have worn out | Inspect the drive belt and replace if required |
| Dive belt may have slipped off the pulley | Install the drive belt back on to the pulley | |
| Friction wheel may have worn out | Replace the friction wheel |
Service and Maintenance
Most issues with Husqvarna snow blowers may be avoided by obeying safety rules and proper service and maintenance works. Table below describes basic maintenance works to be performed on Husqvarna snow blowers and its intervals. Machines should be services every 2-3 years or when not used for a longer period of time.
Table 2. Maintenance works schedule Husqvarna snow blowers
| Interval | Task |
|
Before Each Use
|
Check if the fasteners are loose |
| Check the engine’s oil level | |
| After Each Use | Inspect the snow thrower |
|
After every 25 hours
|
Lubricate all components as per the chart |
| Change the engine’s oil | |
|
After every 50 hours
|
Inspect and replace the V-belts if required |
| Inspect the blower’s muffler | |
| After 100 hours | Replace the spark plug |
Adjusting the engine’s throttle:
The engine’s speed or RPM can be adjusted with the throttle control lever. The lever is located at the side of your snow blower, on the engine. It is recommended that you always operate the snow blower with the throttle set to the highest setting for the best throwing performance.
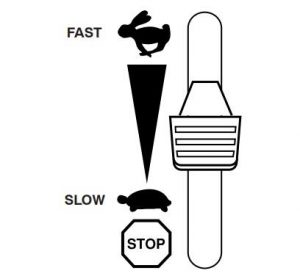
You can also further adjust throttle with the choke control, also located on the side of the engine. If your blowing conditions are colder than usual, you may need to use the choke control to provide that extra bit of throttle temporarily to start your engine. Never try this to start the engine when the engine is already warm.
Adjusting the snow discharge chute:
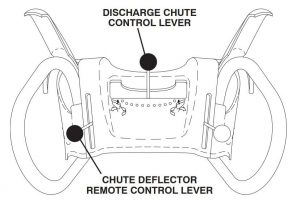
It’s important that you pay attention at all times to where the blower’s discharge chute is directed when operating the unit. Since the exposed front-end of the mower is susceptible to run into small objects, these can be thrown out the chute and cause significant damage to property and people. The direction of the chute can be adjusted with the discharge chute control lever.
Press the lever downward and the proceed to move the lever to the left or right side to adjust the direction of the chute – do so until the chute has reached the desired position. You can also make adjustments to the throwing distance of the blower to throw snow further away or close to the machine.
As with the direction control lever, push downwards in the chute deflector control lever before you proceed to move the lever in the forward or backward direction to adjust the throwing range of the discharge chute. After selecting the desired position, allow the lever to spring back and lock into position.
Operating the snow blower:
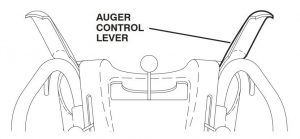
You can control the rotation of the main auger with the auger control lever – this is located on the right handle of the unit. Squeezing the auger handle will activate the auger rotation and commence snow throwing. You can stop the auger’s action by releasing the lever to stop throwing.
If conditions become harsh and the discharge chute begins to get clogged up, you can clear out the debris with the clean-out tool. Simply take the tool out from the mounting clip and with a firm grip oon the handles, proceed to push the tool into the tube in order to remove the blocking debris.
Moving the snow blower forwards and backwards:
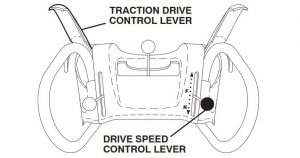
The blower is self-propelling, and the movement in both forward and reverse directions can be controlled with the aid of the traction drive control. This lever is located on the handle at the left side of the blower. Squeezing the traction drive control lever activates the drive system and initiates movement. You can stop movement by simply letting go of the traction control lever.
You can also control the blower’s speed and the direction with the drive speed lever. As with the traction control lever, push down on the drive speed lever and proceed to shift it to the desired position – make sure that you do this before you engage the traction control lever.
Slower speeds are generally more efficient when the snowfall is heavy and dense, while slower ground speeds are ideal for lighter snowfall.
Steering the snow blower:
The blower comes with power assisted steering, enabling you to turn the blower without a mechanically powered steering system – this allows for quicker, sharper turns. Both the handles contain a steering trigger located right beneath it – squeezing the corresponding left or right trigger will cause the blower to steer in that direction.
If snowfall is heavier than usual, you can use drift cutters to navigate through denser snow and achieve the same level of efficiency you see with lighter snowfall – this is especially useful when the snow is higher than the front end of the blower. Loosen the bolts securing the upper adjustment nut in order to lift the drift cutter to the highest position – now proceed to tighten the nut once again to secure it in place.